Tuesday, March 7, 2023

Departing Sunspots

Afternoon Session

My last solar imaging session was months ago in October!  Thereafter, most days were cloudy, or too cold, or too windy. Finally, on February 18th, a clear day arrived without strong wind or freezing temperature. I waited for afternoon to let temperature rise into the mid-40's and began imaging at 1:45 pm EST. Seeing was mediocre. There were no dramatic prominences, and most sunspots were located in the Sun's western hemisphere where they were destined to depart in the next few days by rotating out of view. The first image below is a 12-panel mosaic showing features in the western hemisphere.

Four sunspots are visible above. The most prominent one is sunspot 3226 in the northwest quadrant. In the southwest quadrant, from left to right, are sunspots 3220, 3217, and 3225. A few dark filaments appear on the disc.

Major sunspot 3226 with a light bridge across the umbra shows up well in the next close image. View it at 100 percent to see all the detail present.

Sunspots 3220, 3217, and 3225 also look nicely detailed when viewed at 100 percent in the following image of the southwest quadrant.
Sunspot 3217 is accompanied by a fan-shaped filament. Sunspot 3225 is closest to the limb where its neighboring white energetic region will rotate out of sight before the following umbra. Sunspot 3220, on the left, has a single umbra.

One other sunspot of note, 3229, was in the eastern hemisphere. It had emitted a powerful X-class solar flare just a day or two before. On February 18th, however, it appeared like this:

Evidence of 3229's eruptive nature remains in the image above. A dark filament arches above a white active area to the left of the umbra. Shooting straight up are narrow spiky eruptions emerging from the left-most white energetic area. View the image at 100 percent to see this best.

These images turned out remarkably well in spite of sometimes unsteady afternoon seeing. All images were made by stacking the best 400 frames from 4,000-frame videos.


Monday, February 27, 2023

Finderscope Experiment

Too Many Aberrations!

When I purchased my 130 mm Stellarvue refractor years ago it came with an 80 mm f/3.75 finderscope. I was curious to see if the finderscope could function as a 300 mm focal length telephoto lens when attached to my new Nikon Z6 2 camera. On February 13th I mounted the combination on a fixed tripod as shown in the picture below and hurried outside to take advantage of some rare clear sky.

Exposure times were limited to two seconds to avoid star trails. I compensated for short exposures by setting ISO at 51200. Focusing was extremely difficult because the finderscope has a helical focus mechanism. Since the camera was fixed to the tripod, I had to turn the entire finderscope to focus. This somewhat stiff rotation caused so much vibration on the unsteady tripod that it was hard to tell if stars were focused. Consequently, star images are a little bloated in the images that follow.

Lens aberrations are immediately apparent away from center in this full frame image of the Pleiades star cluster made by stacking seven 2-second unguided exposures.

The finderscope lens is probably a simple single spherical lens. Only the very center of such a lens is relatively free from aberration. There's a reason good telephoto lenses are so expensive! Unlike the finderscope, quality telephoto lenses contain multiple lens elements which, in combination, correct for the spherical and chromatic aberration seen here. I cropped out the majority of edge distortion and ended up with the next Pleiades image.

In the cropped picture above you can see how individual star images are slightly out of focus and bloated. You can also see a blue fringe on stars from chromatic aberration. On the positive side, the seven-image stack actually captured some silvery reflection nebula around two of the stars! The image scale also nicely includes the entire cluster!

I next tried capturing stars of Orion's belt with a stack of ten 2-second unguided exposures. The same edge aberrations were present in these full frame images, so I cropped out the edges to leave the following central region, slightly more than three degrees across.

The Flame Nebula and Horsehead Nebula are slightly visible on the left near the left belt star, Alnitak.

It's hard to point a camera at Orion without trying at least one image of the Orion Nebula, M42. The final cropped image below is just a single 2-second exposure. Notice blue fringes on stars due to chromatic aberration.

I really like the image scale of these pictures, but the finderscope/camera combination is really impractical. I don't think I'll try this again. Perhaps I'll buy a real 300 mm or 400 mm telephoto lens sometime in the future. For now, I'll look forward to using the camera with my 130 mm refractor for some guided exposures.


Sunday, February 19, 2023

New Camera and Dobsonian Telescope

Testing a New Combination

Although my 12-inch Dobsonian telescope doesn't track stellar motion caused by Earth's rotation, I thought it would be interesting to test short exposure times with my new Nikon Z6 2 camera attached to this large aperture. On February 6th I gave it a try. A special adapter is required to attach the camera to the scope. The camera would not reach focus with first adapter I purchased. Eventually, I bought another adapter that brought the camera's focal plane a couple centimeters forward, enough to achieve focus.

The telescope effectively acted like a 1500 mm telephoto lens. I quickly discovered stars would trail unless exposures were very short. An approximate rule for avoiding star trails in unguided photos is to keep exposure times in seconds less than 500 divided by the lens focal length. For my telescope the rule said 500/1500 = 0.3 seconds would be the longest exposure I could take. Trial and error proved the rule accurate. To compensate for short exposure time I cranked the ISO up to 51200! The next image is a 0.3-second exposure of the Orion Nebula, M42, at ISO 51200. In spite of background noise associated with high ISO the image captured a lot of detail in only 0.3 seconds!

The Pleiades were high in the sky above most light pollution before the Moon rose. Another 0.3-second exposure at ISO 51200 captured only part of this cluster as seen in the next image. I should have moved the field of view around, taken a series of images, and then combined them to capture the entire cluster. Maybe I'll try this another time. The diffraction spikes on bright stars are kind of pretty!

I was particularly interested to see how Jupiter would look in a short exposure. The following 0.05-second exposure at ISO 500 overexposes the planet but allows all four major Jovian moons to be visible.

Based on the previous picture it looks like this particular telescope/camera combination might be great for capturing certain kinds of planetary conjunctions.

On this night, February 6th, comet C/2022 E3 ZTF was passing near the star, Capella, in the constellation, Auriga. I searched the neighborhood of Capella while looking at the camera's viewfinder screen, but couldn't find the comet. Instead, I took a picture of bright Capella itself with a 0.3-second exposure at ISO 51200. Yellow overexposed Capella shines nicely with accompanying diffraction spikes in the next image.

In my light polluted sky I misidentified the star Almach in Andromeda and photographed Mirach instead. I was surprised to see a faint, fuzzy object to the lower right of bright Mirach in the following image. The faint object is actually the 10th magnitude elliptical galaxy NGC 404! It's amazing how this faint distant object actually showed up in just a 0.3-second exposure at ISO 51200!

Finally, I tried a 0.2-second exposure at ISO 51200 to capture most of the star cluster, M41, in Canis Major. 

Soon after capturing M41 the nearly full Moon rose making the sky even worse for imaging. It was time to quit.

These results with very short exposure times make me wonder how nice it would be to have a 12-inch telescope on a tracking equatorial mount. Longer exposures with no star trailing would really show amazing stuff!


Saturday, February 11, 2023

Comet C/2022 E3 ZTF

Partial Success

Almost all comets I've been able to observe have been difficult targets. They usually appear inconveniently close to the horizon, often before dawn when it's hard to get out of bed. Recently, prominent comet C/2022 E3 (ZTF) had an orbit bringing it close to the north celestial pole, so, for a good stretch of days, the comet was located relatively high in the sky to the north.

The comet's unfamiliar name has the following explanation according to earthsky.org: "It was discovered on March 2, 2022 and it was the third such object discovered in the fifth half month (A, B, C, D, E) of the year". (E3) It was discovered by a 48-inch telescope on Mount Palomar which is part of the Zwicky Transient Facility (ZTF). The C indicates it is a non-periodic comet.

I made several attempts to photograph the comet with my new Nikon Z6 2 camera. The first attempt on January 15th was successful as you can see in the following image which was constructed by stacking five 30-second guided exposures with a 70 mm f/2.8 lens at ISO 800.

The green coma and brighter part of the yellow dust tail are visible. Ultraviolet light from the Sun excites diatomic carbon present in gases emitted by the comet. The excited diatomic carbon then emits a green visible color. The dust tail's yellow color comes from reflected yellow sunlight. Darker skies, larger apertures, longer exposures, and telescopic magnification would be needed to reveal the long, dim, wispy ion tail which is not visible above.

I tried again on January 24th when the comet was closer to Earth. The next image is a stack of six 6-second unguided exposures at ISO 6400 with the 70 mm lens set at f/2.8.

Now the comet tail had spread out into a fan shape with a spike pointing ahead of the coma. This is a little easier to see in the following heavily enhanced, cropped image. Enhancing the image to reveal dim details also, unfortunately, brightens background noise. Therefore, the background sky doesn't look as black as it should. (All these images should be enlarged to see the comet in better detail.)

Viewing conditions were much more difficult on January 30th, two days before the comet made its closest approach to Earth. On this night the temperature was wonderfully mild, but the Moon was almost full, and the sky was covered with hazy thin clouds. In addition, it was very humid, and dew rapidly formed on exposed surfaces. Since the comet was closer to the celestial pole this night, I tried a slightly longer exposure time with the unguided camera mounted on an ordinary stationary tripod. The next image is a stack of nineteen 8-second exposures at ISO 6400 with the 70 mm lens at f/2.8.

Unfortunately, haze and moonlight worked together to diminish what should have been a brighter coma and possibly longer dim tail. 

The sky was completely overcast when the comet came closest to Earth on February 1st. After February 1st there were a few more opportunities for interesting comet pictures. For example, on February 6th the comet passed close to the bright star, Capella, in the constellation, Auriga. The Moon was nearly full that night when I tried imaging the comet with a 12-inch Dobsonian telescope. Unfortunately, I couldn't find the comet in the telescope's relatively small field of view. On February 10th the dimming comet passed close to Mars, but the sky was cloudy again. Clouds were forecast for almost every night after February 10th. The comet will rapidly dim as it recedes from the Sun and Earth and travels out into the solar system.

Thursday, February 2, 2023

Venus-Saturn Conjunction

Pretty Scene at Dusk

Close after sunset on January 23rd Venus and Saturn were only about 1.25 degrees apart as they sank in the western sky below a nice crescent Moon. My new camera produced this nice image which is best viewed at full size. (Bright Venus is above dim Saturn.)

Earthshine on the Moon adds to the beauty! On the previous evening the planets were even closer together - only about 1/3 degree apart. Unfortunately, it was cloudy on January 22nd.
 

Wednesday, January 25, 2023

Constellations

New Nikon Z6 2 Camera

I've grown increasingly frustrated with the limited capability of my phone camera for night sky photography. The phone is conveniently portable and easy to set up, but the simple phone lens, restricted exposure times, and low available ISO values always make me wish for more. So I was excited to see how a newly purchased Nikon Z6 2 mirrorless camera would perform when imaging starry skies.

The new camera, with its 24-70 mm f/2.8 lens, is a beauty, although the number of small control buttons makes it look like it's suffering from control button pox!

Check out all the tiny buttons on the back. 

I've been finding it hard to work these controls with cold fingers in the dark! Notice the large view screen which acts like an excellent viewfinder. It makes focusing on dim targets much easier than squinting through a small viewfinder.

I hurried to use the camera on January 9th, the first clear night available, and set it on an ordinary camera tripod for some trial exposures. The next image is a 6-second unguided exposure at ISO 800 with the lens set at 49 mm and f/2.8. Orange colored Mars is the bright object between the V-shaped Hyades Cluster of Taurus below center and the Pleiades cluster above center. Wow! I was pleasantly astounded by the number of stars visible and how well they were focused. If you enlarge this image to 100 percent, you'll see how amazingly sharp it is! It looks best when enlarged.

In order to increase exposure time and magnification the camera needs to be attached to a polar aligned mount with a motorized drive that follows Earth's rotation. I haven't had much luck with ordinary camera tripod drives. I find them too fragile and easily knocked out of polar alignment when moving a camera to different views. So I attached the new Nikon to my sturdy, solid Paramount MX telescope mount as seen below.

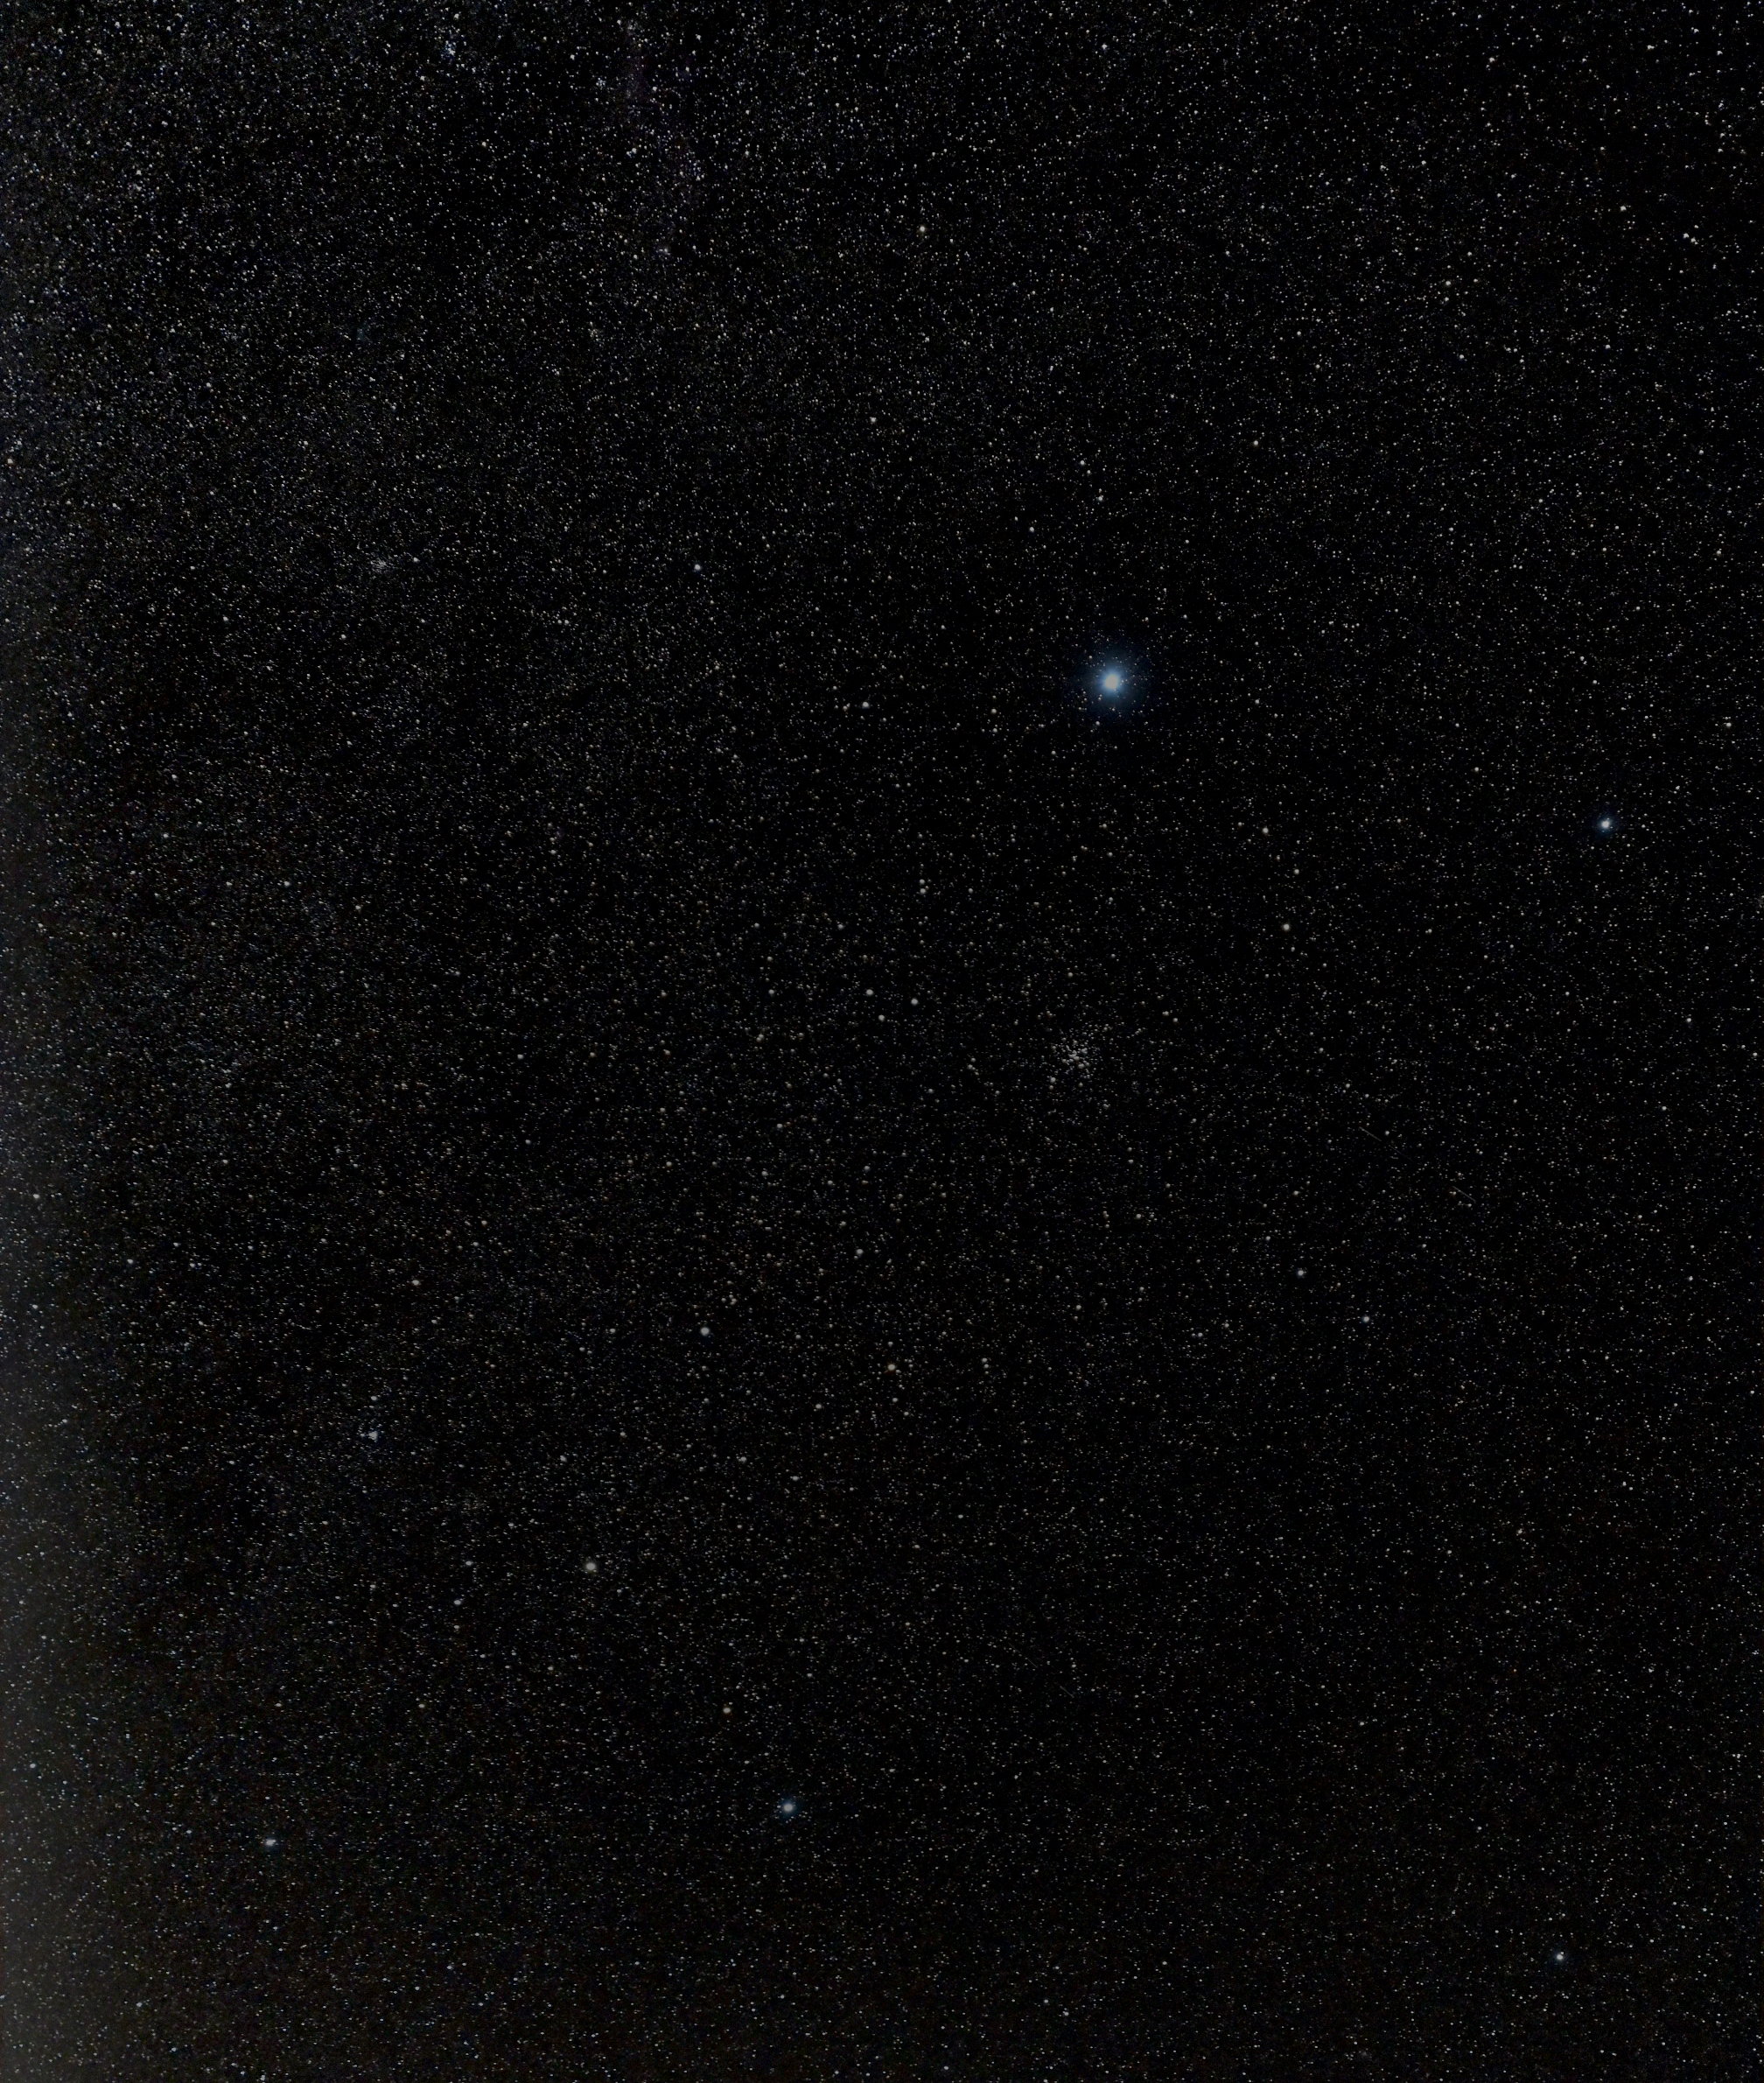
This setup is obviously more complicated than a simple camera tripod. It also requires a laptop to initially start up the mount. But the camera can be pointed in all directions without disturbing polar alignment. After initial start up the laptop isn't required for pointing because the mount can be moved with a hand controller alone. Notice the red band wrapped around the forward end of the lens. 
This is a Haida dew heater which prevents dew or frost forming on the lens as temperature drops during the night. Dew covered lenses have endlessly frustrated me in the past! This dew heater works perfectly!

I was now ready to try longer guided exposures and higher magnification. On January 15th skies were clear again. Temperatures in the low 30's made me suffer, but I managed to obtain some good images through lots of trial and error. For example, the next picture is the constellation, Auriga, showing the bright star, Capella, in the upper left and Auriga's three major star clusters, M38, M36, and M37 arrayed top to bottom on the right of center. The winter Milky Way runs through the center of Auriga and you can see the huge number of stars captured in this image. The image was constructed by stacking five 30-second exposures for an equivalent 2.5 minute single exposure. The lens was set at 70 mm and f/2.8, and ISO was 800. Enlarge the image by clicking on it to see it in best detail.

Notice the apparent lack of color in Auriga's stars. Capella should be yellow. At this point I hadn't yet learned enough to make star colors more apparent.

The Paramount isn't perfectly polar aligned, but the inaccuracy usually doesn't cause much star trailing in 30-second exposures. Also, 30-second exposures are the maximum the camera allows unless an external controller manages the "bulb" exposure setting. I need to explore longer exposures in the future.

Another successful image was obtained by stacking three 30-second exposures of a portion of the constellation, Andromeda. This portion contained the Andromeda galaxy, M31, as you can see below. The lens was set on 70 mm and f/2.8, and ISO was 800. Once again, the image needs to be enlarged to see hints of a dust lane in M31 as well as M31's small companion galaxy, M110, to the right of M31.

Mount tracking was slightly inaccurate during this Andromeda exposure. Stars are slightly elongated. Color is also lacking in the image.

I eventually discovered color appears when choosing higher ISO numbers and using different options during the stacking process, including specifying HDR (high dynamic range). For example, look at the next image of the constellation, Canis Major. The bright star, Sirius, has a distinctive blue color. This image was made by stacking three 30-second exposures made at ISO 3200 with lens setting 70 mm and f/2.8. Star cluster M41 is visible below Sirius. Enlarge the image to see best detail.

Notice the incredible number of stars visible! These really are stars because I checked their locations on detailed star maps. There is an unfortunate bright background blemish between stars on the left edge of the previous image. Although the winter Milky Way is located to the left of Canis Major, the bright background between stars on the left is likely noise I've failed to eliminate.

Finally, I pointed the camera toward the constellation, Orion, placed nicely high above murky horizon light pollution. With luck, all my neighbors' annoying floodlights were miraculously turned off, so conditions were near the best possible in my back yard. The next picture is a stack of four 30-second exposures at ISO 3200 with lens set at 70 mm and f/2.8. Lots of colors appear! I was honestly exhilarated to see this image emerge from the stacking process! Please enlarge the image to explore its contents.

The Orion Nebula, M42, is shining in Orion's sword. The Flame nebula is visible above the star, Alnitak, on the left side of Orion's belt. Dim red nebulosity containing the Horsehead Nebula is even visible below Alnitak. (The Horsehead itself is a dark indentation in the red nebulosity, but isn't sharply defined.) Also visible is part of Barnard's Loop, a dim red circular arc on the left of Orion's belt. Betelgeuse is orange, Rigel is blue, and the number of visible stars down to roughly magnitude 15 is absolutely amazing! Most of the tiny, tiny dots visible upon enlarging the image are actually stars, not noise! Unfortunately, the image is blemished by hazy bluish background noise which I am not skilled enough to remove. I didn't capture a dark frame or a good quality flat field frame. I'd like to apply these calibration images in the future to see if they will reduce background noise.

I tried increasing ISO to 6400 and made the next Orion image from a stack of only two 30-second exposures with lens set at 70 mm and f/2.8.

There isn't much obvious difference between the ISO 3200 image and the ISO 6400 image, so 3200 might be a good choice for future settings. Now that I know setting combinations that work I'd like to try either stacking more individual images or use exposure times longer than 30 seconds. Better mount polar alignment would help, but, even after years of experience, I still haven't discovered a quick, efficient method of improving the Paramount's alignment beyond rough approximation. 

My ability to tolerate cold night observing and sleep deprivation has diminished with age. It doesn't take long for my fingers to numb and my resolve to weaken. I look forward to warmer weather in the coming months.


Friday, October 14, 2022

Solar Flare

Explosion in Progress

During the morning of October 7th a complex sunspot group produced an M1 class solar flare over a period of about 3 hours. At this time my sky was clear and observing conditions were excellent. For a telescopic sun watcher like me this was like winning a lottery prize! Here's a satellite picture of cloudless Virginia while the flare happened (from the Penn State Weather Wall Map). My observing site is marked with a red X. There was no wind, the atmosphere was steady, and temperature ranged in the upper 60's. Conditions don't get much better than this, although I was buzzed by a few hovering yellow jackets! Two neighboring sunspot groups produced the flare. When I began recording at 13:54 UT (9:54 EDT) the eruption was already in progress. In the next image sunspot group 3116 is on the left and 3112 is on the right. The flare is in the white overexposed areas left of the largest umbra. (Click on the images for enlarged views.)  Later, at 14:35 UT (10:35 EDT), the situation had changed. The next image shows the sunspots 41 minutes after the previous image was recorded. Seven minutes later, at 14:42 UT (10:42 EDT) the white energetic areas deformed further.  My last image, captured at 14:56 UT (10:56 EDT), showed more changes. I quit imaging when seeing conditions worsened. Apparently, I stopped before peak flare output, as you can see in this graph from the Space Weather website. It shows the timing and intensity of the flare. It would have been nice to record a series of evenly spaced images over an hour or more to produce a smooth time lapse flare animation. Unfortunately, it's only possible to animate a time span of 21 minutes between 14:35 and 14:56 UT with four unevenly spaced pictures. The greatest changes happen in the white eruption just above center. Small arching filaments also change shape just to the right of the biggest dark sunspot umbra.  Next is a 9-panel disc mosaic which shows the sunspot group nearly centered. A few filaments are scattered about. There were nice prominences around the solar rim as you can see in the next 15-panel mosaic. The disc has been overexposed to make the relatively dimmer prominences stand out.  Just as in my last observing session, the eyepiece view of prominences was outstanding. The delicate, fan-like prominence on the bottom was particularly beautiful! In the eyepiece the Sun and prominences are a deep red color that I find difficult to faithfully reproduce in my images. The next picture, with overexposed disc blacked out, attempts to capture the eyepiece view. It doesn't quite do the job, however. All images above can be enlarged for a more detailed view. They look best that way.


People say I'm crazy doing what I'm doing
Well they give me all kinds of warnings to save me from ruin
When I say that I'm o.k. well they look at me kind of strange
Surely you're not happy now you no longer play the game

People say I'm lazy dreaming my life away
Well they give me all kinds of advice designed to enlighten me
When I tell them that I'm doing fine watching shadows on the wall
Don't you miss the big time boy you're no longer on the ball

I'm just sitting here watching the wheels go round and round
I really love to watch them roll
No longer riding on the merry-go-round
I just had to let it go

John Lennon