Tuesday, February 13, 2024

Roaming the Night Sky

Learning to Use Seestar

An unusual number of clear, moonless nights in early February were a great opportunity to get more familiar with my new Seestar 50 automated telescope. It's so easy to carry it outside and begin observing after only 10 minutes of prep time!

On February 3rd I first targeted the famous Horsehead Nebula (IC 434) near the star Alnitak in Orion's belt. A recent firmware update now enables Seestar to take 20 or 30-second exposures in addition to the original 10-second option. So I tried using 20-second exposures for capturing the Horsehead. Image capture began successfully, but eventually stopped after running for 18 minutes. Apparently, tracking errors during 20-second exposures were too great to continue acceptable stacking. I employed the onboard light pollution filter which passes red hydrogen light. In spite of less accumulated exposure time than planned, the 18-minute result was reasonably nice.

I still have a lot to learn about image processing, however, because the previous image isn't as dramatically bright as I'd like. The red color is dull.

For the rest of the evening I reverted to the usual 10-second Seestar individual exposure times. Open star cluster M41 in Canis Major was my next target. The telescope tracked well and produced the next image after only 10 minutes of adding 10-second exposures.

Open cluster M46 in the constellation Puppis is an interesting object because planetary nebula NGC 2438 is included in the field of view. You can see the little green nebula to the left of M46 in the following image obtained by stacking 10-second exposures for 25 minutes. The planetary nebula is a foreground object lying along the line of sight to the cluster. It isn't actually part of the star cluster.

While seated comfortably inside my warm house I commanded Seestar to point to galaxy M81 in Ursa Major. This time I centered the galaxy instead of placing it on the edge of the field of view as I had done in a previous attempt. The northern celestial location of M81 diminished guiding errors during the 68-minute accumulated exposure time that produced the next image.


The Owl Nebula, M97, is also located in Ursa Major. This planetary nebula was my next northerly target. Stacking 60 minutes worth of 10-second exposures gave the following image.

This evening's last target was the famous Rosette Nebula in the constellation, Monoceros. It's located to the left of Orion's bright star, Betelgeuse. This nebula, mostly glowing in red hydrogen light, surrounds a central star cluster NGC 2244. I employed Seestar's light pollution filter again and stacked 10-second exposures for 60 minutes. The camera's field of view is too small to capture the entire Rosette Nebula, so the image below only shows the right half of the full circular shaped nebula. Notice the strings of dark dust to the right of center.

Once again, I'm disappointed by how dull the red color appears. There is surely a way to correct this with image processing, but at this point, I don't know how. 

During this night I learned some practical information about Seestar. Field rotation shows up as distorted areas on opposing diagonal edges of long exposure images. I've cropped these blemishes out of images displayed here. The central field of view isn't affected.

Seestar's battery inevitably ran low on this cold night with the telescope's dew heater continuously drawing power. Seestar starts complaining about low battery when the charge falls below 20 percent. The battery is good for 3 or 4 hours under these conditions. Extended operation time can be obtained by plugging Seestar into its battery charger while Seestar operates. In addition, over hours, my controlling tablet battery begins to discharge as well. The tablet can also be connected to its charger while working to extend its life.

It was well after midnight when I decided to quit. Shutting down and bringing Seestar inside took about three minutes, a wonderful advantage compared to hauling in several heavy components of my more complicated astrophotography equipment.


Saturday, February 3, 2024

Seestar 50

New Astrophotography Gadget

Over the years I've tried night sky astrophotography in several forms, never with great success. My accumulated collection of quality equipment never seemed enough to produce excellent results. I don't have a permanent observatory. It's getting physically harder to haul everything outside, set it all up, and tear it down afterward, especially in freezing conditions.

I recently discovered and purchased an easier, relatively inexpensive alternative for astrophotography called the Seestar 50. At first glance it doesn't look like a telescope!

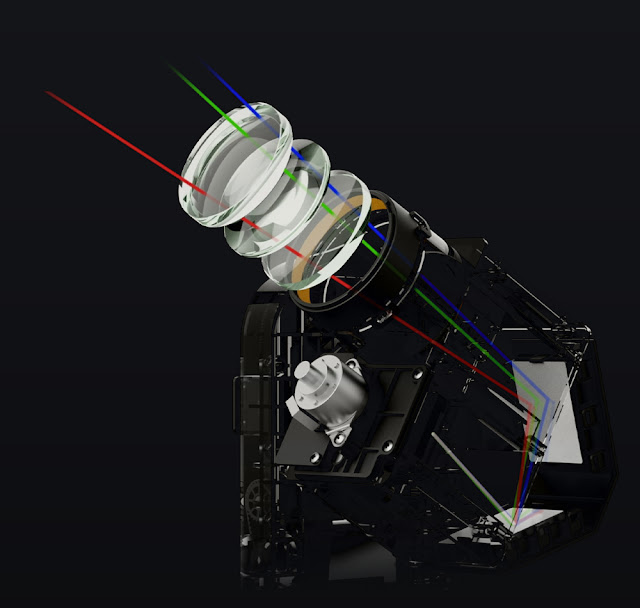
A small telescope, camera, filters, dew heater, and rechargeable battery are all contained inside this astounding device. It comes with its own tripod, and is controlled through a wifi connection to either a smart phone or tablet. The 50 mm telescope lens is visible in the next picture.

An image from the manufacturer's website shows the internal design.
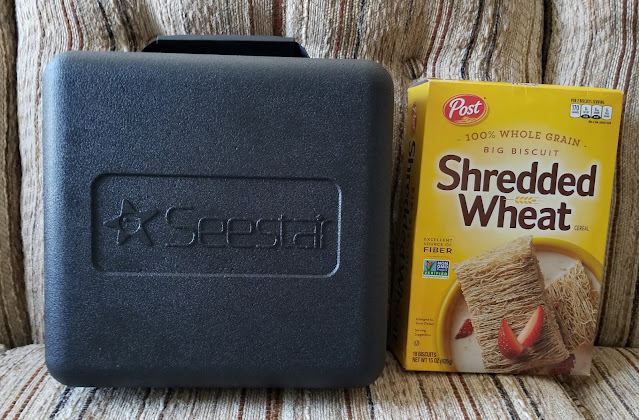
The whole thing is amazingly compact, just a bit larger than a cereal box.

It's also extremely portable because the telescope, tripod, solar filter, and USB cable fit within a small hard plastic carrying case.
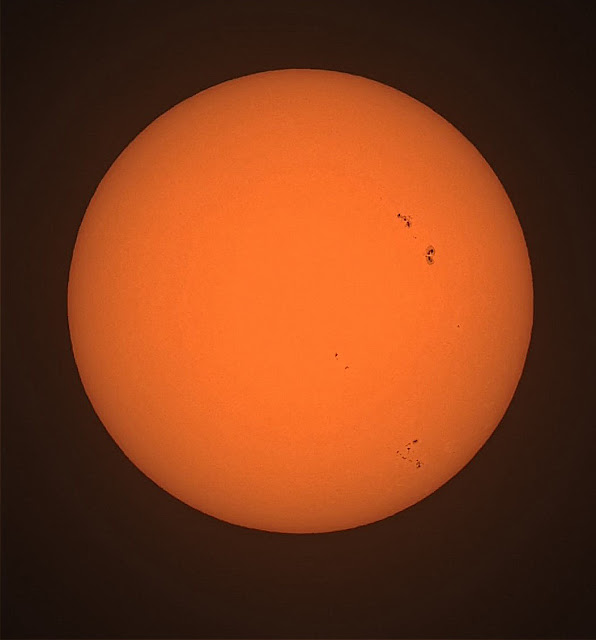
When my new toy arrived I wanted to explore its capabilities immediately. Inevitably, cloudy weather was forecast for several days. On January 24th I peeked outside and noticed large gaps between daytime clouds. I rushed outside, set the small telescope down on a garden wall, powered it up, put on the included solar filter, established a wifi connection to my phone, and, using my phone, commanded it to point to the Sun. Amazingly, it pointed to the Sun!

I took a couple Sun pictures and one video. It was really easy to shut down and carry inside when clouds increased minutes later, a welcome change from the effort and time needed to break down and pack up my more complicated telescopic equipment. Clouds parted long enough to capture the quick Sun photo shown below (slightly sharpened using Registax wavelets). The image is good enough to show the whole Sun with scattered sunspots. It isn't a high resolution image capable of being magnified like images I get from my dedicated solar telescope, but it's good enough to show some detail in larger sunspots.
Seestar can photograph surrounding landscape when put in scenery mode. It then acts like a camera with a telephoto lens. In scenery mode it doesn't track sky movement caused by Earth's rotation. After imaging the Sun I tested this capability by pointing at a distant neighbor's rooftop vent and got this clear detailed image.
After this brief initial session I wanted to inspect the pictures and move them to my laptop. I could see the pictures on my phone, but I'm not fond of tiny screens and lack of visible detail in small images. I assumed images would be stored in the telescope's onboard memory. (It has about 60 GB of internal memory.) Unfortunately, the image files there were empty. I learned the onboard memory only stores videos and stacked images, not individual JPEG snapshots. The snapshots were on my phone. I could view them on my phone, but they were somehow imprisoned within the telescope control app itself. I spent hours trying to figure out how to get them out of the app and into the phone's regular picture gallery where all my photos are normally stored. Online help wasn't useful. Eventually, I found a 15-step procedure to accomplish getting the images to my laptop. The phone app is designed to easily post telescope images directly to the telescope company's instagram-like online sharing app. So I had to first sign into an account (yet another password to create and remember). Then I posted an image to the sharing site. Then I copied the URL for my post from the phone into my laptop browser. Then I was able to save the image onto my laptop from within the post displayed there. At this point I was pretty discouraged. If I had to do this for every image, it would be ridiculous!
 
I also installed the telescope control app on my tablet as well as my phone. The tablet has a more recent Android version than my phone, so there was hope tablet image files would be easier to access.

Clouds persisted into the evening of January 26th. Just before going to bed I peeked outside and noticed significant gaps between clouds. I rushed outside with the little scope. This time I used my tablet to control Seestar instead of my phone. The larger tablet screen was nice. It was a pleasant warm 60 degree night. I sat comfortably next to the scope and pointed it toward the full Moon. In no time I had a couple nice snap shots of the Moon and one video. Conditions were about as poor as possible for any other imaging. The full Moon was reflected from many scattered clouds and neighbor's spotlights were shining directly into my backyard. This picture of the nearly full Moon was made by stacking 16 frames from a 161 frame AVI video.

Afterward I discovered images stored on my tablet were easy to access and transfer to a laptop, so I won't be using my phone to control Seestar.

Three days later, on January 29th, the evening sky finally cleared and the bright Moon did not rise until about 9:30. This was my first opportunity to use Seestar for long exposures of deep sky objects. In deep sky mode Seestar builds images by taking many consecutive ten-second exposures and automatically stacking (adding) them up to produce an equivalent single long exposure. My first target was the famous Horsehead Nebula in Orion. This dim nebula requires long exposure times. After a couple false starts I began to accumulate results. The image stack appeared to be building up as expected, but then it stopped getting brighter. Soon the telescope stopped imaging and told me the Horsehead's altitude had become too high for accurate tracking. I think images were being rejected from the stacking process because of tracking errors. So I switched to a much easier target, the famous Orion Nebula which has been imaged endless times by astrophotographers. I centered the nebula, commanded the internal light pollution filter to be inserted in the light path, and started accumulating 10-second exposures. During the subsequent half hour imaging time I went inside my house and monitored progress in comfortable interior warmth while the telescope continued working in the cold outside. The wifi connection was strong enough to allow telescope control from a distance! I could even watch TV while monitoring the image on my tablet! Thirty minutes later I had captured the image shown next.

Wow! The image above is better than any of my laborious previous attempts with other equipment!

Next I tried an object in the north, the galaxy pair M81/M82 in Ursa Major. Without going outside, I used my tablet to command the telescope to point to M81. It was extremely satisfying to see the preview image appear nearly centered on the tablet screen! Unfortunately, the galaxy pair was arrayed across the narrow side of Seestar's rectangular field of view, so both galaxies are near the edges. This is one of the disadvantages of Seestar. There's no way to rotate the field of view like I can when my Nikon is attached to my large refractor. At some other time of night the galaxies might be in another more favorable orientation within the field of view. I'll have to explore the possibilities in the future. I accumulated ten-second exposures for 20 minutes and produced the following image.

I should have centered on the spiral M81 and tried a longer exposure on just M81 alone. Maybe next time.

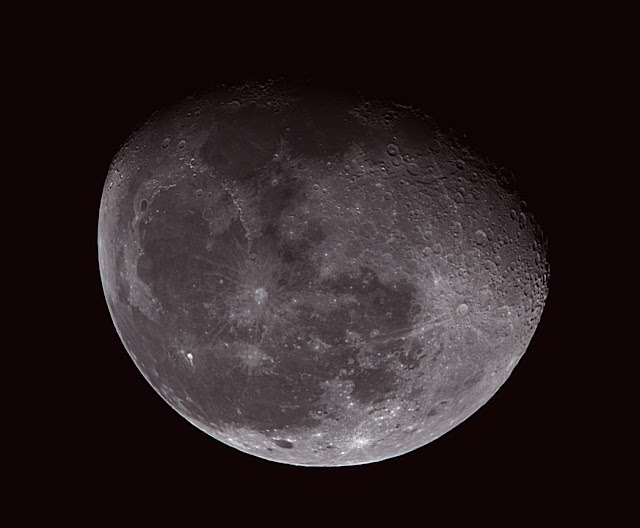
Eventually, the 88-percent illuminated gibbous Moon rose and Seestar's battery was getting low. It was time to stop long exposures. Before shutting down I pointed toward the rising Moon and took a 90-second AVI video. I then stacked 100 out of 1,000 video frames to produce the next lunar image.
Seestar has some disadvantages. The telescope has a relatively small 50 mm aperture. The altitude/azimuth mount cannot track without incorporating unavoidable image rotation during long exposures. Tracking is difficult at high altitudes near the zenith. The field of view is small. Image quality will never match what is produced by larger, more expensive equipment. On the other hand, portability and wonderful ease of use are valuable compensating advantages. On cold nights when the effort to set up complicated equipment becomes an obstacle, Seestar overcomes the motivational obstacle. Requiring only one short trip outside, it can begin capturing images within about 15 minutes of startup. And it can be controlled wirelessly from within a comfortable house! I'm very happy with the Seestar system and looking forward to using it more!

Saturday, December 2, 2023

Sunspots Bloom

Holiday Display

On November 23rd, Thanksgiving day, the Sun displayed beautiful features. It happened to be a rare cloudless day in my part of the world! This imaging opportunity was too good to pass up, so I hauled my equipment outside in cool autumn conditions. Temperature ranged from 47 to 50 degrees while I worked in gentle breezes. It was comfortable in a light jacket. Unfortunately, the Sun was relatively low in the sky, and atmospheric seeing was mediocre. Nevertheless, it was thrilling to witness solar activity this day. The next image reveals why I was so happy. (Click on images to enlarge for better detail.)

The previous image is a mosaic consisting of 37 individual panels. I superimposed a 20-panel disc mosaic on top of a 17-panel prominence mosaic. Major sunspots appear in the left (eastern) hemisphere, and dramatic prominences are scattered all around the limb. A nice filaprom hangs on the eastern limb. Although this mosaic isn't perfect, it's one of the best I've ever produced.

There seems to be something like a quantum mechanical uncertainty principle when it comes to simultaneously capturing both disc and prominence detail. If exposures and processing are chosen to best show disc detail, then prominence detail diminishes. If exposures and processing are chosen to reveal prominence detail, then disc detail is overexposed and washed out. The only ways I know to exhibit both disc and prominence detail is to either superimpose two separate images, or to process disc and prominences separately within the same image. The first image above is an example of superimposing two separate images. The next image is an example of processing disc and prominences separately within the same image. It shows, diagonally up from left to right, sunspots 3500, 3494, and 3493 along with dramatic prominences on the limb.

The image above was captured at 9:37 EST. At 10:21 EST, 44 minutes later, the middle prominence had evolved into a faint, wispy structure shown in the next 3-panel mosaic processed to exhibit prominence detail. Notice how disc detail is overexposed and washed out in order to reveal the dim prominence. Also notice the nice "filaprom" (prominence to filament transition) farthest up on the limb to the left of the upper sunspot group.

The second large sunspot group, filaments, and a prominence are shown in the next image.

Sunspots above are, from left to right, 3491, 3492, and double umbra 3490. They make an attractive scene.

Two smaller sunspot groups along with the 3491, 3492, 3490 group are visible in the next image. It was constructed by cropping a 7-panel interior disc mosaic.

Sunspot group 3489, with three small umbras, is below center, while another small spot, 3498, is near the right edge. A larger view of sunspot 3489 is shown next.

Finally, I caught two small flares in progress before ending this observing session. The next two images show the first flare, a white overexposed area below double-umbra sunspot 3490. The top image was captured at 9:15 EST. The bottom image shows the flare erupting 83 minutes later at 10:38 EST.

The second flare appears as two white overexposed areas on either side of a dark filament sitting to the left of sunspots 3493/3494. The top image below was captured at 10:04 EST. The bottom image shows the flare eruption 20 minutes later at 10:24 EST.

Seeing conditions significantly deteriorated as noon approached signaling an end to this very productive observing session.


Thursday, November 9, 2023

Sunspots Return

Lots of Filaments

Sunspot numbers and solar features had decreased significantly during October. Many nice clear mornings were available for imaging, but I let them pass without hauling out my equipment. Finally, on November 3rd, enough interesting features appeared to make observing worthwhile. It was 50 degrees under a cloudless autumn sky. Although there was no wind, seeing was mediocre. Two major sunspots were visible along with a good variety of filaments as you can see in the following 22-panel mosaic made with a 3X Barlow lens. (Click on images to enlarge.)

Sunspot 3477 has the darkest umbra on the lower left. Small, newly emerging sunspot 3480 is to the left of 3477 near the limb. Double umbra sunspot 3474 is near the right limb. A dramatic sinuous filament stretches out from the left edge.

The previous image was processed to show disc details. The next image, processed differently, shows prominences around the limb.

Three examples of "filaproms" are visible above. These reveal gradual transition from prominence to filament when a prominence extends from the limb onto the disc. The "filaproms" show up even better in the next 14-panel mosaic made from images obtained with camera settings specifically chosen to brighten prominences. Unfortunately, disc features are overexposed as a consequence.

There's one "filaprom" at the top, one at the bottom, and one on the left edge of the sinuous filament. I don't think I've ever captured so many "filaproms" at once!

Next are closer views of the eastern hemisphere showing both sunspot 3477 and the sinuous filament.

Finally, a close detailed view of filaments in the northern solar hemisphere shows them well when the image is viewed at full size.

Sunspot numbers are predicted to increase in coming months as the solar activity cycle gradually approaches maximum.
 

Saturday, October 14, 2023

Halloween Fun

Neighborhood Displays

I'm enjoying some interesting Halloween decorations near my home. Sizes are often amazing. For example, look at this enormous Jack Skellington figure I frequently pass on bike rides. It's almost as tall as the two story house behind!


Another giant display is a huge inflatable black cat. Once again, houses nearby give a sense of scale.

The cat's spine is lit at night!

This giant scarecrow's hat reaches second story windows.

A really nice multi-spook display includes another scarecrow holding his grim reaper scythe. The werewolf is particularly cool, and the flying witch is suspended in mid air. (Click on images for a larger view.)

At night werewolf eyes glow eerily, but true color doesn't show well in the following nighttime photo.

Finally, my favorite display is the skeleton picnic erected by my son-in-law. Their card game is accompanied by a pizza box!

The picnic is colorful at night, although the photo below doesn't capture true color.

Halloween decorations these days are much more elaborate and amusing than any in my childhood memory.


Saturday, September 30, 2023

Clear Sky Continues

Nice Prominence Display

As mentioned in the previous blog, I spent several hours on the evening of September 15th capturing 233 individual images of various celestial objects. With much of my equipment left outside, I stumbled into bed at 1:40 AM on September 16th. Clear sky persisted into the morning of the 16th. I dragged myself out of bed after too few sleeping hours and went for a run. Then I hustled outside to image the morning Sun while good conditions continued. Equipment accumulated dew overnight which I dried off with towels. Mounting my solar telescope took less time than usual because more than half the equipment was already outside.

Not many dramatic sunspots were visible, but some nice prominences were displayed around the solar limb. The next image, a mosaic of the central disc, shows the only sunspots present. Sunspot 3433 is on the left. The other sunspot pair has small umbras. Spots 3434 on the left and 3429 on the right are connected by a white, energy emitting structure. A long dramatic dark filament stretches out in the upper right. (Click on images to enlarge.)

The following 11-panel mosaic, shows the relative lack of disc features.

Although disc features may have been sparse, there were a good number of prominences around the limb. Some are shown in the next mosaic which has been processed to reveal prominences.

An arched prominence appeared on the Sun's northern limb.

The southeastern limb had some spiky emissions from an emerging sunspot.

Finally, an enormous arching prominence with one explosive spike was displayed on the southwestern limb.

By the time this solar imaging session was over I was completely exhausted. Forecasts predicted cloudy skies for the next two weeks, so I appreciated the chance to take advantage of rare clear sky.


Thursday, September 21, 2023

Starry Night

Success at Last!

Sky conditions were too good to pass up on the evening of September 15th! Humid, hazy, cloudy, summer air was finally replaced by cool, clear, dry, moonless sky! In addition, by some chance miracle, all five usually annoying neighbor spotlights were turned off most of the time. Of course, perfection is hard to attain. Light poured out from one neighbor's unshaded windows. This window light was easier to tolerate than glaring spotlights, however. So, all things considered, conditions were about as good as I can hope for in my backyard. This was a great opportunity to use my Nikon Z6 2 camera with a 130 mm Stellarvue refractor.

With temperature comfortably in the mid-60's I spent time setting up equipment and bringing the telescope mount up to speed. Eventually, all was ready. Sagittarius was getting lower in the southwest, so my first photographic target was the Lagoon Nebula (M8). The next image is a stack of thirty, 20-second exposures at ISO 6400. (Click on images to enlarge.)

For some reason the nebulosity has a purple color instead of being correctly red. Ten minutes of total exposure captured a good amount of glowing gas, and the background sky is reasonably black. The small golden clump to the left is NGC 6544, a globular cluster.

Next, I moved to another object in Sagittarius, the Eagle Nebula (M16). Once again, I stacked thirty, 20-second exposures at ISO 6400 to get the following image.

Nebulosity is inaccurately purple again. More exposure time is needed for this object. If you enlarge the image and look at the nebula center, you can just begin to see the "Pillars of Creation" made famous by the iconic Hubble Telescope image of the same name.

Now it was time to leave objects near the horizon and point the telescope closer to a darker zenith. The next image of Brocchi's Cluster, also known as "the Coathanger", came out particularly well!

The Coathanger's star colors are not quite as dramatically intense as some photos I've seen, but the asterism nicely fills the frame and shows up very nicely! I'm really happy with this picture, made from a stack of fifteen, 20-second exposures at ISO 6400. The small concentration of stars in the lower left corner is NGC 6802, an open cluster.

The beautiful color contrast double star, Albireo, is in the same neighborhood as Brocchi's Cluster. I moved there next. A 2X Barlow lens was required to produce significant separation between the pair which are only 34.9 arc seconds apart. The gold star is about 60 light years closer to Earth than the blue star, so they are a chance alignment rather than an orbiting pair.

The blue and gold star colors are only apparent on the outer fringes because star centers are overexposed. I should have realized this would happen for these bright stars. In this case, fifteen, 20-second stacked exposures was overkill! If I try this again, exposures shorter than 20-seconds would be better.

Large planetary nebula M27 was also relatively nearby. With a 2X Barlow lens fifteen, 20-second stacked exposures at ISO 51200 yielded the following image.

Twenty second exposures are the limit of my unguided mount before slight star trailing begins to show up with a 2X Barlow lens.

I removed the Barlow lens and captured the Double Cluster in Perseus by stacking thirty, 20-second exposures at ISO 6400.This image shows the clusters very well at full size, so click on the image to enlarge 100 percent. A few yellow stars are scattered about.

Finally, the constellation Andromeda had risen high enough for its famous galaxy, M31, to become a target. Unfortunately, stacking only thirty, 20-second exposures at ISO 6400 did not capture enough light to fully reveal the galaxy's outer arms. The outer arms and dust lanes are only partially visible in the next image. Their visibility may depend on properties of the device screen used for viewing as well as room lighting. M31's two companion galaxies M110 and M32 are visible. M110 is the larger companion below M31 and M32 is the smaller fuzzy spot above M31. The galaxy and its companions nicely fill the image frame.

Temperature had dropped to 58 degrees near 1:00 AM. My observing stamina has diminished with age. I was getting a bit chilly. After hauling the telescope and camera inside, I left other equipment outside so I could collapse, exhausted, into bed at 1:40 AM.


People say I'm crazy doing what I'm doing
Well they give me all kinds of warnings to save me from ruin
When I say that I'm o.k. well they look at me kind of strange
Surely you're not happy now you no longer play the game

People say I'm lazy dreaming my life away
Well they give me all kinds of advice designed to enlighten me
When I tell them that I'm doing fine watching shadows on the wall
Don't you miss the big time boy you're no longer on the ball

I'm just sitting here watching the wheels go round and round
I really love to watch them roll
No longer riding on the merry-go-round
I just had to let it go

John Lennon