Sky Is Too Bright
I've been impatient to see how a new Nikon Z6 2 camera would work when attached to my 130 mm Stellarvue refractor. Although sky conditions were poor on March 4th, strong winds had diminished, and it wasn't terribly cold. A 94 percent full Moon was present, but I decided to haul out my equipment and see what kind of images were possible. Before sunset I set up the telescope and camera as shown below.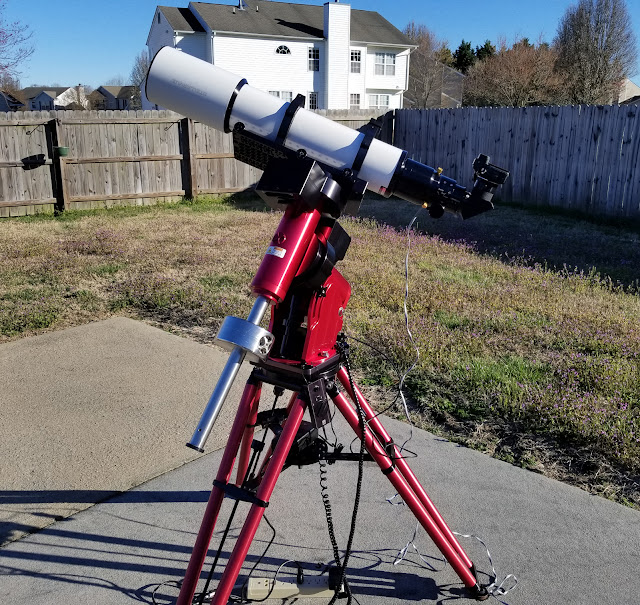
It takes quite a while to assemble the tripod, balance the telescope, hook up the electrical connections, and set up a laptop computer. I used a star diagonal with the camera instead of a straight through attachment because, otherwise, it would be hard to see the camera viewing screen with the scope pointed near the zenith.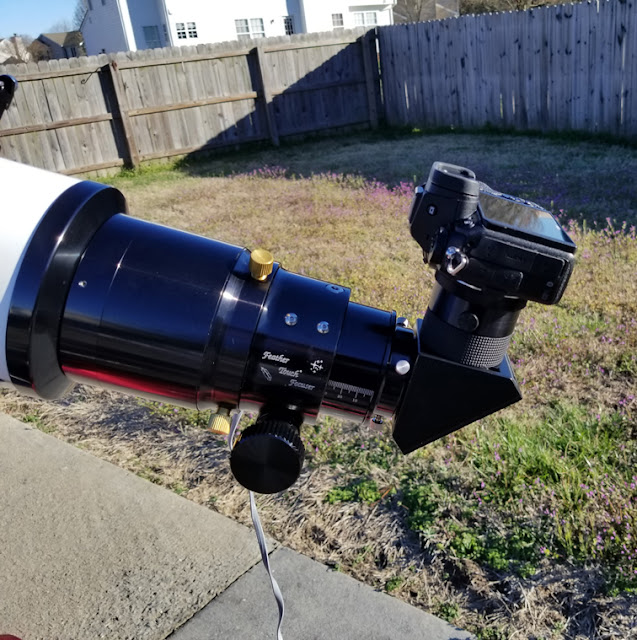
The temperature had fallen to about 52 degrees a few hours after sunset, but bright moonlight filled the sky with natural light pollution. I took this single shot 1/60-second picture of the Moon at ISO 100 using a 2X Barlow lens:I quickly discovered how bright moonlight, neighborhood lights, and lack of flat field frames made all my pictures nearly useless at first inspection. For example, look at this image of the Pleiades star cluster constructed by stacking sixteen, 4-second exposures with ISO set at 51200.
Notice how the background sky looks blue instead of black. Also, notice the bright circular central region caused by uneven illumination of the camera sensor. A flat field frame (image of a uniform light source) would record uneven illumination and allow me to eliminate it. But I didn't record a flat field frame. It took hours of image processing to reduce initially awful unnatural colors. I also cropped out obvious vignetting around the outer edges of the original image. The central circular glow is an image flaw, but the hazy silver glow around three bright stars near the bottom is a hint of real reflection nebulosity.
One of my neighbors had a back yard floodlight shining directly on the telescope from two houses away. This made it impossible to photograph the flame nebula in Orion. All trial images had strange colors and light arcs caused by reflection of the floodlight in the telescope tube. Eventually, Orion rose high enough to avoid unwanted reflections and I was able to get the following picture of the Orion Nebula by stacking two, 15-second exposures at ISO 6400.
It took many attempts of trial and error image processing to correct erroneous colors and reduce the effects of sky brightness. You can still see evidence of vignetting and a hazy remnant of light pollution in the previous image. I think I can do better with longer exposures on a darker night.
I pointed the telescope at two star clusters hoping they would show up reasonably well in the bright sky. The image of cluster M37 in Auriga shown in the next image is disappointing because star colors don't seem correct. This image is a stack of twelve, 5-second exposures at ISO 51200.
Inaccurate colors are even more evident in the next image of cluster M35 in Gemini. Smaller, more distant cluster NGC 2158 is visible above M35. This is a stack of 24, 5-second exposures at ISO 51200.
Other star images I've made with this camera under darker skies with different lenses have produced accurate star colors. I'm guessing the camera's white balance was possibly thrown off by bright moonlight and the neighbor's floodlight. Looking back at pictures with correct star colors I noticed how histogram plots for separate red, green, and blue channels significantly overlapped. In these latest incorrectly colored images, however, the red, green, and blue histograms didn't overlap at all! Eventually, I discovered a way to make color corrections using Photoshop. These corrections made the three histograms overlap more. Yet, true colors didn't seem fully restored. I also wonder if I set ISO values too high. I'll have to experiment more when the sky is darker. After a while I inserted a 2X Barlow lens and tried capturing other celestial targets. All the pictures below were made using the 2X Barlow. Galaxies M81 and M82 in Ursa Major are only about 37 arc minutes apart, so I thought I might fit them in one field of view. For this shot the telescope pointed away from the annoying floodlight and away from the bright Moon. This is a stack of ten, 6-second exposures at ISO 51200. M81 is in the lower right and M82 is in the upper left.
Faint traces of M81's spiral structure are visible, but background sky brightness and short exposure times don't permit visibility of dim details. I'd like to try this again with better conditions. Although the telescope was tracking sky rotation, tracking was inaccurate due to poor polar alignment. Inaccurate tracking limits exposure time. I still don't have a quick, efficient way to get good polar alignment with my non-permanent mount. I found elongated star images in exposures longer than about 8 seconds. If I want to improve image quality, I'll have to find some solution to the polar alignment problem.
Another group of closely spaced galaxies is located in Leo. The next image shows M65, M66, and NGC 3628 together. This is a stack of eight, 8-second exposures at ISO 51200.
Faint edge-on galaxy NGC 3628 is in the upper left, M66 is in the upper right and M65 is below center. Once again, hints of faint spiral arms are present.
Globular cluster M3 in Bootes had risen far enough above the horizon to make the next image possible. This is a stack of eight, 8-second images at ISO 51200.
Finally, planetary nebula NGC 2392 in Gemini is visible in the next picture made from a stack of ten, 6-second exposures at ISO 12800. The 2X Barlow didn't provide enough magnification to show much detail. I also wonder if the color is accurate.Temperature had dropped to about 47 degrees just after midnight. I was getting tired and chilled, so it was time to quit. All the equipment was bone dry! There was not one drop of dew! Other conditions were imperfect, but I couldn't complain about dew! After I took everything apart and hauled all the gear inside, just as I was closing the door, my neighbor turned off the blasted floodlight!


